Layer Height in 3D Printing: The Trade-off Between Quality and Speed
What's the best layer height for your 3D print? Learn how layer height affects quality, strength, and print time. Practical guidelines for every application.
Dennis
3Dennis
Contents
One of the most common questions about 3D printing is: “What layer height should I use?” The answer is more nuanced than you might think, because layer height affects not only how your print looks, but also how strong it is and how long it takes.
In this article, we dive into the technology behind layer height and provide practical guidelines for different applications.
What exactly is layer height?
In FDM 3D printing, an object is built layer by layer. Each layer is a thin slice of plastic melted onto the previous one. Layer height is simply the thickness of each individual layer, usually expressed in millimeters.
Common layer heights range from 0.1mm (very fine) to 0.4mm (coarse), with 0.2mm as a popular standard. But what do these numbers mean in practice?
Finer layers: the benefits
Visually smoother surface
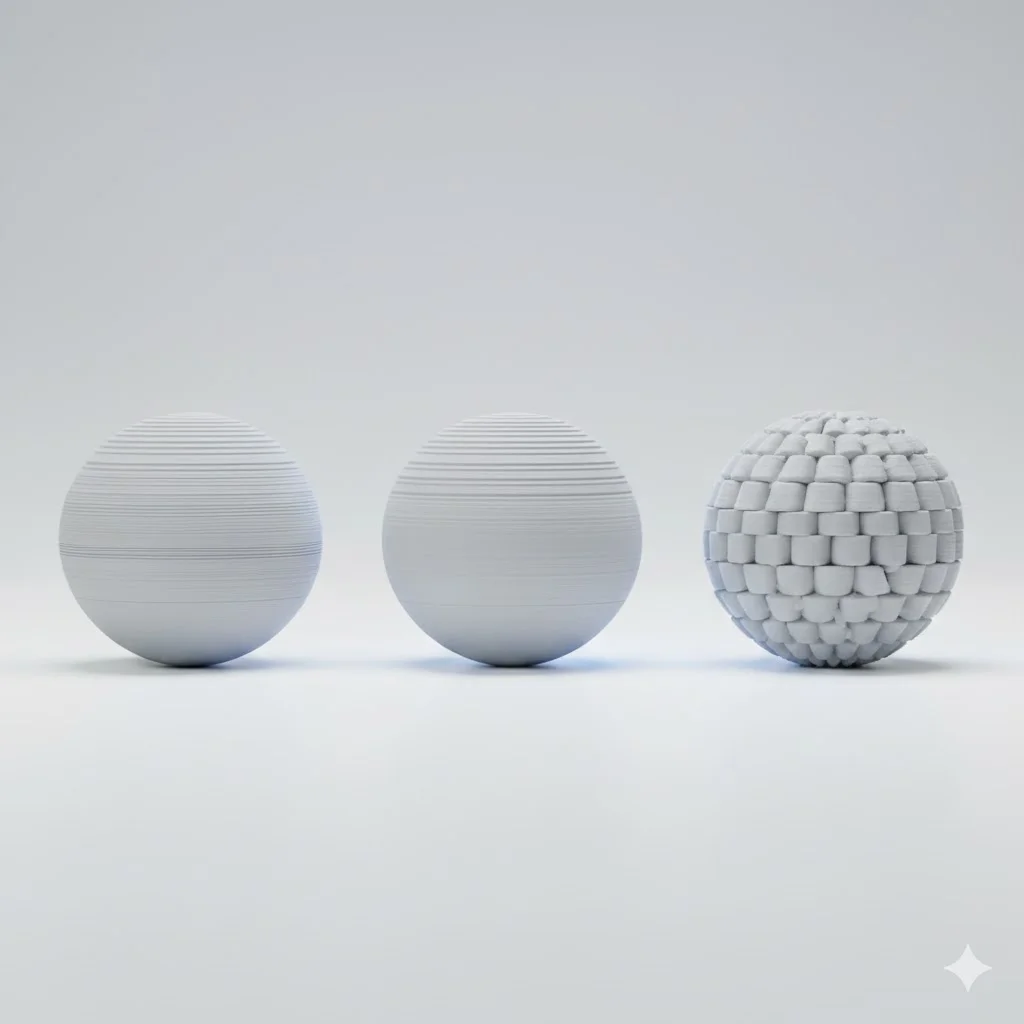
The most obvious advantage of fine layers is surface quality. At 0.1mm layer height, individual layers are barely visible, while at 0.4mm they form obvious “steps.”
This difference is especially noticeable on curved surfaces and angles. A sphere printed with 0.1mm layers looks smooth, while the same sphere with 0.4mm layers is clearly faceted.
Better details
Fine layers make it possible to print smaller details. Thin text, delicate patterns, and subtle shapes come out better at lower layer heights.
Overhangs also benefit from fine layers. Each layer protrudes only slightly from the previous one, making steeper angles possible without support.
Nicer top surfaces
The top layer of a print looks smoother with fine layers. With coarse layers, gaps between infill lines and the top layer can be visible, giving a pillow effect.
Coarser layers: when are they better?
Significantly faster printing
The main reason to choose coarser layers is speed. A print with 0.3mm layers finishes literally three times as fast as the same print with 0.1mm layers - you only need a third of the layers.
For functional parts where appearance is less important than function, this is often the better choice. Why wait three hours when one hour also works?
Stronger layers between layer directions
Counter-intuitively, prints with coarser layers are sometimes stronger. This comes from better layer adhesion: each layer has more material and more contact surface with the layer below.
The difference is especially noticeable under load perpendicular to the layer direction. A part that’s pulled apart in the Z-direction is stronger with coarse layers than with fine ones.
Better material flow
With very fine layers, flow can become inconsistent, especially with cheaper printers or difficult materials. Coarser layers are more forgiving and give more consistent results.
Choosing the perfect layer height
There’s no universal answer, but here are guidelines based on application:
For visual models and prototypes
Choose 0.1-0.15mm when the end result needs to look good or when you’re presenting a design to a client. The extra print time is worth the investment for a professional-looking result.
For functional parts
The standard 0.2mm is often the sweet spot here. It provides a good balance between surface quality and strength, with reasonable print times.
At 3Dennis, we use 0.2mm as standard for most products. It’s fine enough to look professional, but practical enough for efficient production.
For mechanical parts under load
Consider 0.24-0.3mm for parts that need to withstand forces, especially in the layer direction. Better layer adhesion gives a stronger end product.
For quick iterations and tests
During development, when you want to quickly test many variations, 0.3mm or even 0.4mm is fine. It’s about shape and function, not appearance.
Technical limitations
The nozzle sets the limits
Layer height must match your nozzle diameter. As a rule of thumb: layer height should be between 25% and 75% of the nozzle diameter.
With a standard 0.4mm nozzle, this means a range of 0.1mm to 0.3mm. Want to print finer? You need a smaller nozzle. Coarser printing requires a larger nozzle.
First layer is special
Many slicers use a thicker first layer (often 0.3mm) for better adhesion, regardless of the set layer height. This isn’t a mistake but a deliberate choice that improves reliability.
Variable layer height
Modern slicers support variable layer height: fine layers where details matter, coarser layers where they don’t. This gives the best of both worlds, though it requires more setup.
What we recommend
After thousands of prints in all layer heights, these are our standards:
- 0.16mm for products where visual quality is priority
- 0.2mm for most functional parts
- 0.24mm for mechanical parts needing maximum strength
We deviate based on specific customer requirements or technical needs, but these three options cover 95% of all use cases.
Conclusion
Layer height is a choice, not a given. Understanding the trade-offs helps you make the right choice for each project.
Unsure which layer height best suits your part? Send us your design and we’ll gladly advise on optimal settings.
Keep reading
Choosing the Right Infill Percentage: A Complete Guide
How much infill does your 3D print really need? Learn when to use 20%, 50%, or 100% infill for optimal strength, weight, and print time.

Common 3D Printing Mistakes and How to Avoid Them
Learn from others' mistakes: the most common 3D printing problems and how to prevent them. From warping to layer adhesion - practical solutions explained.
Designing for 3D Printing: Professional Tips
Learn how to design parts that are perfectly 3D printable. From wall thickness to overhangs - the most important design rules for successful prints explained.
Need help with your project?
Contact us for custom 3D prints or B2B services.